Android Can I Upload a Stream to Aws S3
How to upload images to AWS S3 from the Android app.

Deject storage is becoming a must present. Recently I came across a scenario to upload images from an android app to an AWS S3 bucket. Since there is not whatever official documentation for this implementation I had to do a lot of research on it and came upwardly with a customized solution.
Let's get started…
Prerequisites
To save fourth dimension, I'one thousand going to assume that anybody has the prerequisites listed beneath fix up.
- Creating an AWS account(All of the following operations can be washed using free tier).
- Having an Android project(Kotlin) created with an empty activity.
Once you are done with the implementation the app volition look something like this.
Things to be covered:
- Setting up an S3 bucket.
- Setting upward IAM policy and User.
- Setting up a simple UI layout to select and upload images.
- Installing AWS dependencies.
- Adding AWS security credentials.
- Configuring AWS security credentials.
- Method to select an image from the gallery.
- Setting paradigm preview and converting selected prototype to a file.
- uploading to s3 bucket
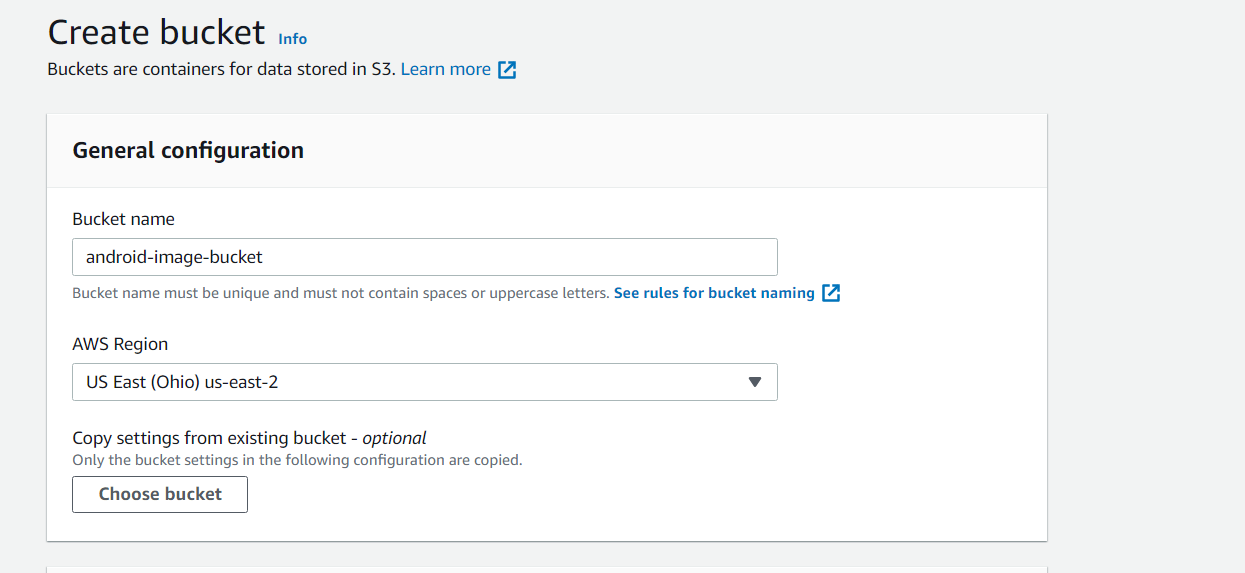
one. Setting up an S3 bucket
In the AWS panel select S3 and cull to create a bucket, give it a unique proper noun, and keep the other configurations as default.
2. Setting upward IAM policy and role for the bucket.
To give permission to your app to admission the S3 bucket, y'all need to apply certain access policies to that saucepan. To do that, first navigate to the services menu and choose IAM. Inside the IAM dashboard, select 'Policies' and create a new policy. A policy defines permissions for actions on resource or services.
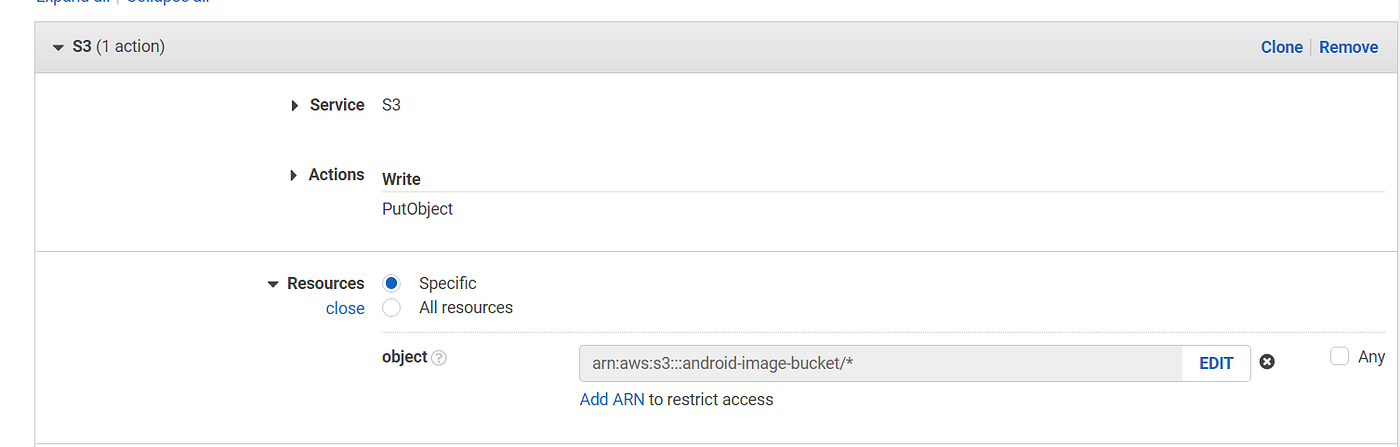
Hither you need to create a policy that allows adding a file to the S3 bucket. For that, you lot have to cull the service as S3 and nether the actions menu, since you need to requite access to write something to the bucket, you accept to choose 'PutObject' under the 'Write' admission level. Equally you are merely going to apply this bucket to upload the image, this detail access permission is enough. Too, at that place are so many actions that can be called based on our requirements.
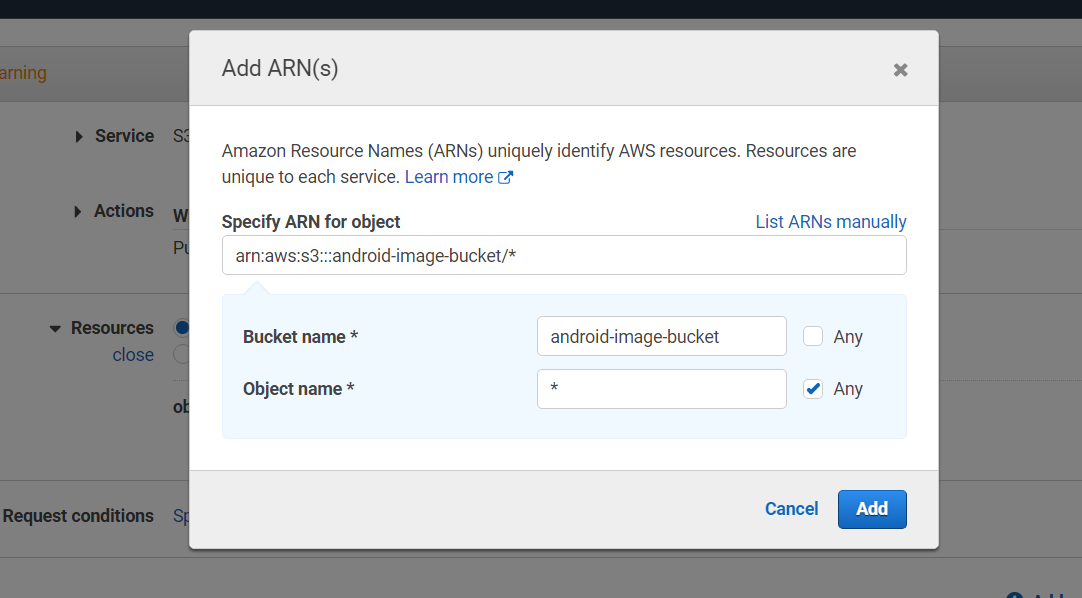
Thereafter, y'all accept to specify for which bucket (resources) you lot are going to utilize the policy, because otherwise if yous don't specify whatsoever bucket, this policy volition be applied to all the buckets in your S3 service, which is not a adept practice. And when it comes to objects, so you have to permit this policy utilise to all the objects within this bucket.
Then follow the adjacent steps, give a unique name to the policy, and create it.
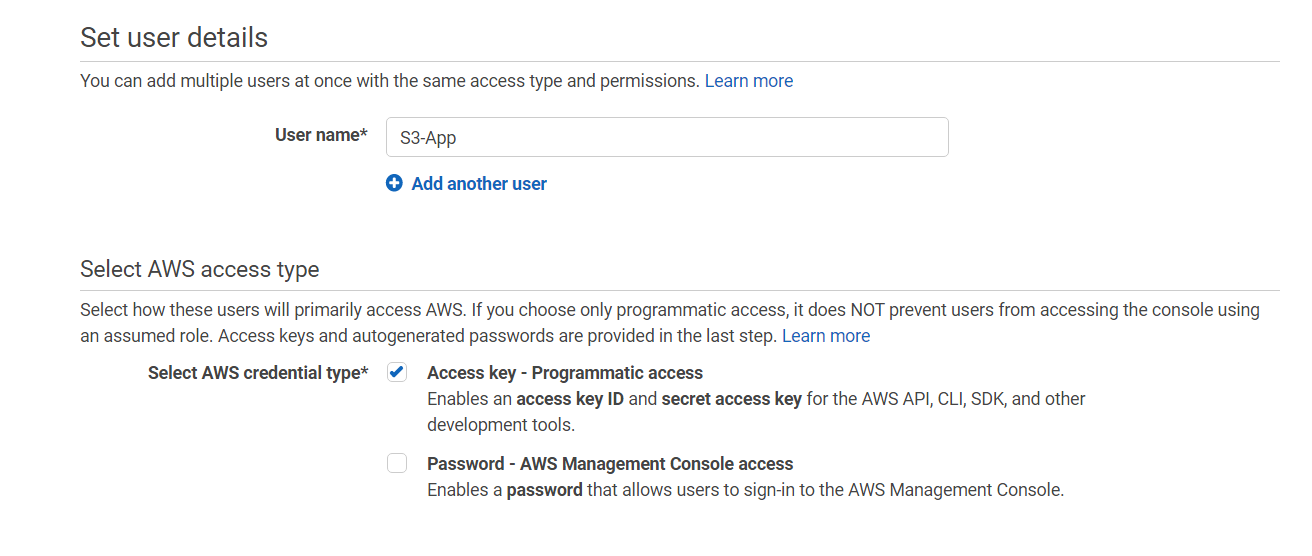
If policy defines what can exist washed on a resource, then "user" defines who can access that resource. For that, you have to create an IAM user.
When choosing the AWS access type for the user, it must be given programmatic access because the user in this case would be the mobile app that is going to communicate with the service programmatically.
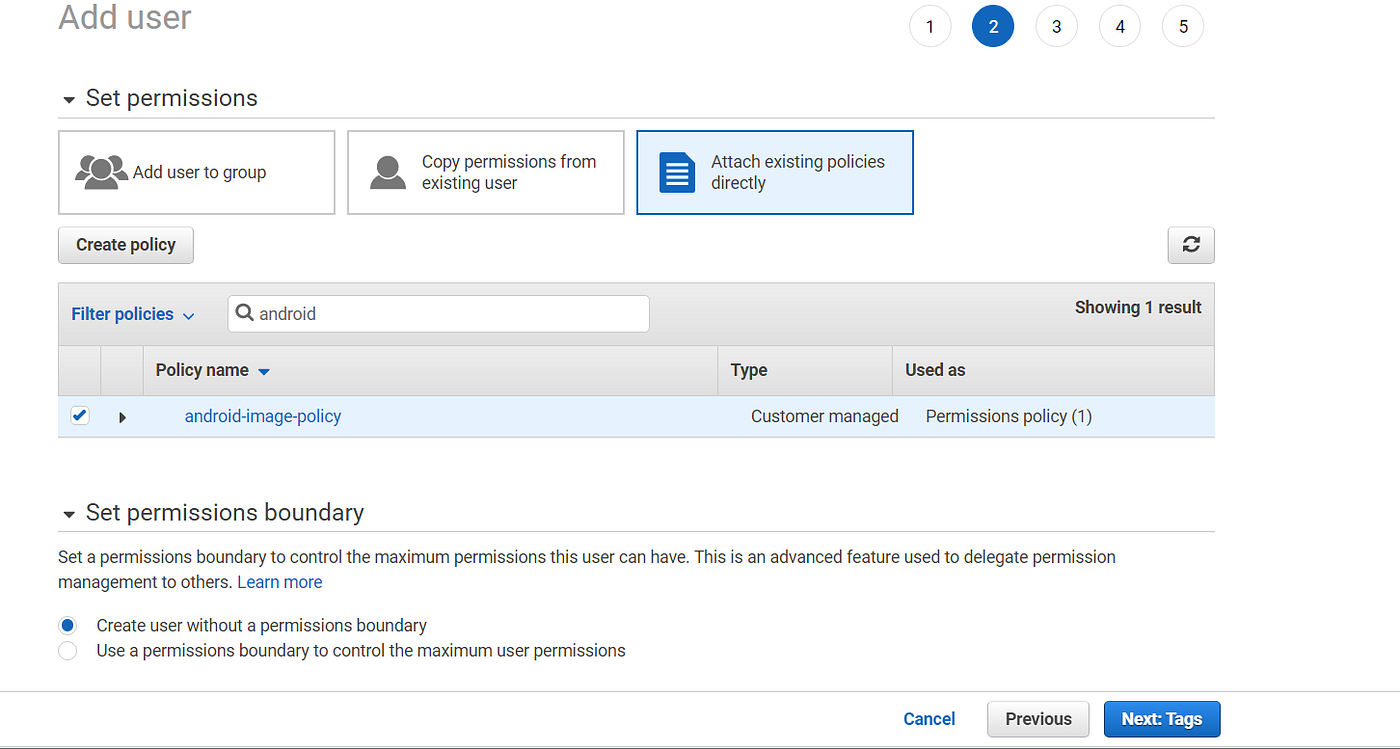
In the next step, choose the policy that you want this user to have admission to. You can choose multiple policies based on the requirements. For this user, it is but the policy that you created earlier that would be enough.
Follow the side by side steps to create the user. Once we create the user it volition display the admission key and undercover cardinal for the user which are actually the credentials to access the service through this user. Here at this point salvage those credentials(Call back y'all won't get to view the secret key hither later on so brand sure you copy this at this point)in a secured location.
3. Setting up the UI
Here I take designed a simple UI that volition permit the user upload the image past clicking the image icon (on the image view). It will besides allow the user cull the image from the file storage (epitome location) and once the upload push is clicked, the uploading procedure will begin. Anyway, you can pattern the UI as you wish.
4. Installing AWS dependencies
implementation("com.amazonaws:aws-android-sdk-s3:2.17.1") Add together this AWS-SDK dependency to your gradle. scripts.
5. Adding AWS credentials
Shop the in a higher place values as constants.
half-dozen. Configuring AWS credentials.
Create an action and set the UI as the view of it. Thereafter import the credentials from the constant file. Configure them as follow.
To access the S3 bucket first, yous need to create an case of information technology, to create an instance of information technology yous need to pass the credentials of the USER that has admission to that S3 bucket yous have created earlier.
BasicAWSCredintials is a class that implements an interface called AWSCredintials which Provides access to the AWS credentials used for accessing AWS services.
An instance of BasicAWSCredentials tin exist created by passing the AccessID and SecretKey as arguments to its constructor, and past passing the BasicAWSCredinitials instance as the argument to the constructor of AWSS3Client, you lot can create an example of the S3 bucket.
7. Method to select an image to upload.
An intent is used to perform an action on the screen. Here, the action we desire the app to perform is to pick an image from the device storage. Since the file type you are going to access is an image, the type of intent must be set to 'images' only.
Also, annotation that you are not restricting the images to whatsoever specific file types.The reason for mentioning the type as 'prototype/*' is that whatsoever blazon of prototype file can be accessed. If you want to pick whatsoever specific type of image file, like 'JPEG' then mention it as 'image/jpeg'.
Thereafter, you have to specify the action that the intent is expected to perform. As yous need to retrieve files from the device storage, you lot have to specify the type of action (ACTION_OPEN_DOCUMENT), that lets the user pick an epitome/file from the storage. Thereafter, you have to phone call the method startActivityForResult() by passing the intent and the request lawmaking (will be explained later) as arguments.
eight. Setting paradigm preview and creating an paradigm file.
The method startActivityForResult() is used to launch an activity for which you would similar to obtain a event when it has finished. When this action exits, the onActivityResult() method will be triggered with the given request code. The asking code can be any int value. The request lawmaking identifies the return result when it arrives.
Once y'all take picked the image, The onActivityResult() method will exist triggered and here you lot take to ostend that the result received is from the activity that invoked the image picking activity by checking whether the returned asking lawmaking and the activity'southward asking code are the same or not, the successful execution of the activeness(result code), and the successful retrieval of information(Uri) through the intent also checked.
The received intent volition consist of the content path of the epitome file (Uri). Here, don't misunderstand Uri every bit the file path. The Content URI includes the symbolic proper name of the entire provider and a name that points to a table (a path), while the file path indicates the absolute location of the file. Using the content URI of the file, you lot tin can set the image that has been chosen as the image view.
At this point, if all works well, then you should be able to run into the image you selected on the screen. To upload this image, we have to catechumen it to a file. The image file can be hands created with the file path of the image past passing it every bit an argument to the constructor File(). But here you don't have the file path. Instead of that, you have the content URI, which is the content path of the paradigm. To create a file using a content URI, first y'all take to read it from its location and then open a stream of the content associated with that URI.
The contentResolver is used to read the file stream using the content URI. The role of contentResolver here is to get you access to the image based on the given URI. You don't need to know the filename or other properties of the file, yous simply need to pass the URI into openInputStream() to access the image and read it. At present you have to write the stream of bytes that have been read before to a file. So earlier writing information technology y'all need to create an empty file.
File.createTempFile(prefix,suffix) creates an empty file in the default temporary-file directory, using the given prefix and suffix to generate its proper noun. The proper noun of the image you upload will be decided according to the prefix and suffix you specify. It would be better if you could find a unique naming pattern for each epitome you upload. Later on the empty file is created, y'all have to write the stream of bytes to that file.
For that, you have to create a stream pipeline for that file using FileOutputStream(), which will create a file output stream to write to the file represented by the specified file object within the parameter and write the data to the file using the created outputStream by passing the bytes of data (byte array) from the inputstream which has the paradigm stream stored in information technology.
nine. Upload the image to the AWS S3 saucepan
Finally, we are into the photo uploading role. First, yous take to create an example of the TransferUtility grade using the instance of the S3 saucepan that you lot configured earlier. TransferUtility provides a simple API for uploading and downloading content from Amazon S3. Y'all can use the upload() method of the transfer utility to upload the epitome by passing the bucket name, primal-value (will exist the proper noun of the paradigm file in the S3 bucket), and the image file.
To keep track of the upload status, you accept to set a listener, which is an case of the TransferObserver class that will notify when progress or state changes. The onStatechanged() callback of the observer is used to notify whether the transfer was successful or failed, while the onProgressChanged() callback is used to keep track of the number of bytes that have been transferred. Here I have set the image view to the default image one time the transfer is completed. And finally, the onError callback is used for error handling.
Note: Recall that here we are uploading the paradigm straight from the app without whatsoever server interaction.
I hope this helped you wrap your head effectually uploading images to the S3 bucket from Android.
Thank You!!
References
https://developer.android.com/reference/android/content/Intent
https://developer.android.com/guide/topics/providers/content-provider-nuts
https://programmer.android.com/reference/java/io/File
https://aws.amazon.com/blogs/mobile/introducing-the-transfer-utility-for-the-aws-sdk-for-android/
Source: https://medium.com/@mathursanb/how-to-upload-images-to-aws-s3-from-the-android-app-a35c603ac9c9
0 Response to "Android Can I Upload a Stream to Aws S3"
Post a Comment